
Migrating zAgileConnect from JIRA On-Premise to JIRA Cloud
Following options describe the steps for migrating zAgileConnect Salesforce-Jira links from on-premise Jira (or another Jira Cloud) to Jira Cloud. The steps will depend on whether the migration of Jira Issue data to Jira Cloud retains the same Issue Keys and Issue IDs, since these are also captured in the corresponding links in Salesforce.
- Please note that zAgileConnect Salesforce package version 1.14.13 or 1.16.x and higher is required for migrating Jira Issue relationships with Salesforce objects other than Case (either Standard or Custom).
- The steps below are also applicable in scenarios where zAgileConnect data is being migrated from one Jira Cloud instance to another Jira Cloud.
For more details on Jira Issue IDs versus Issue Keys, please refer to How to retrieve Jira Issue IDs
Option 1 - If the Jira Issue Keys and IDs will remain the same when migrated from Jira Server to Jira Cloud
Option 2 - If Issue IDs will change and Issue Keys will remain the same during the migration to Jira Cloud
Option 3 - If both Issue Keys and Issue IDs will change during the migration to Jira Cloud
Migration Option 1
This process assumes that Issues being referenced in Salesforce have not been removed or imported with different Issue IDs and Issue Keys during the JIRA migration. In other words, it assumes that JIRA Cloud and JIRA On-Premise match with respect to Issues.
Migration of Salesforce Object-Issue links maintained by zAgileConnect from on-premise JIRA to JIRA Cloud involves the following steps:
- Connect and configure the Salesforce org to the new Jira Cloud instance
- Run the “Refresh Salesforce Properties in Jira“ to push relationships into Jira Cloud
These steps are described below. It is strongly recommended that the following steps be exercised first in test environments.
Connect and configure zAgileConnect with Jira Cloud
The same Salesforce instance that was previously connected to Jira Server can be re-connected to Jira Cloud following the Jira Cloud installation instructions zAgileConnect Installation & Configuration
Please note that after after authentication steps are completed, the remaining zAgileConnect package configuration (Steps 3 thru 6) that is inherited from the Jira Server should either be ‘Saved’ as-is or modified and Saved to allow these configurations to also be pushed to the new Jira Cloud instance.
Refresh Salesforce Properties in Jira
After Salesforce is connected to Jira Cloud the final step is to create the relationships into JIRA Cloud. For that you need to go to: Setup → Installed Packages → zAgileConnect Configure → Refresh Salesforce Properties in JIRA
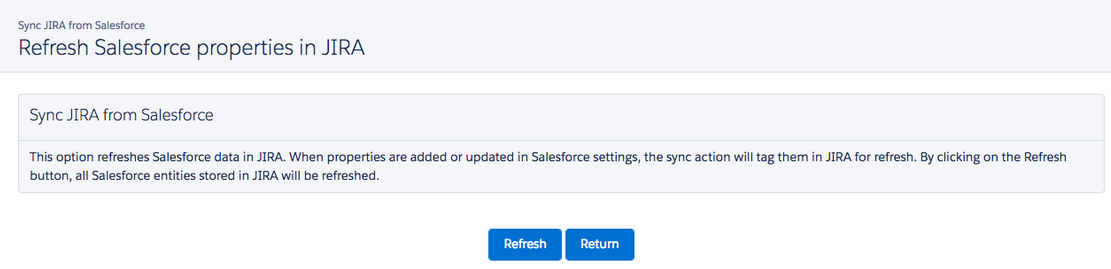
Click on Refresh, it will send all the Salesforce Object-Issue relationships to JIRA. This process will be executed in background and can take several minutes/hours depending on the number of relationships.
Migration Option 2
This process assumes that Issues referenced in Salesforce will be migrated to Jira Cloud with different Issue IDs but same Issue Keys
Migration of Salesforce-Jira links maintained by zAgileConnect to JIRA Cloud (from Jira Server or another Jira Cloud instance) involves the following steps:
Backup zAgileConnect objects representing Jira Issue and Issue-Case relationships
Create a CSV file with Case-Issue relationships
Connect and configure the Salesforce org to the new Jira Cloud instance
Remove zAgileConnect junction objects data
Import the Case-Issue relationships from the CSV file
These steps are described below.
Backup zAgileConnect objects representing Jira Issue and Issue-Case relationships
In Salesforce setup go to Data Export and export the data for ZIssue__c, ZIssue_SF__c and ZIssue_Case__c
Create a CSV file with Case-Issue relationships
Generate a CSV file with only 3 column headers CASENUMBER, ISSUEKEY, ISSUEWASCREATED.
You can use the following SOQL query to retrieve the case-issue relationship data:
SELECT zsfjira__Case__r.CaseNumber, zsfjira__ZIssue__r.name, zsfjira__IssueCreated__c FROM zsfjira__ZIssue_SF__c WHERE zsfjira__Case__c != nullIf your Salesforce instance is connected to multiple Jira instances you will need to use the following SOQL query to filter the output by Jira Connection ID for each Jira instance being migrated:
SELECT zsfjira__Case__r.CaseNumber, zsfjira__ZIssue__r.name, zsfjira__IssueCreated__c FROM zsfjira__ZIssue_SF__c WHERE zsfjira__Case__c != null AND zsfjira__ZIssue__r.zsfjira__ConnectionId__c = 'j00'Replace 'j00' with the Connection Id that corresponds to the Jira being migrated to Jira Cloud.
Workbench can be used to export the data to CSV file via SOQL query.
Make sure to rename the CSV headers to CASENUMBER, ISSUEKEY, ISSUEWASCREATED.
Connect and configure zAgileConnect with Jira Cloud
The same Salesforce instance that was previously connected to the original (source) Jira instance can be re-connected to new Jira Cloud (destination) following the Jira Cloud installation instructions zAgileConnect Installation & Configuration
Please note that after after authentication steps are completed, the remaining zAgileConnect package configuration (Steps 3 thru 6) that is inherited from original Jira should either be ‘Saved’ as-is or modified and Saved to allow these configurations to also be pushed to the new (destination) Jira Cloud instance.
Remove zAgileConnect objects data
Delete all the records for ZIssue__c Salesforce object. This delete will also delete in cascade the data for the junction objects (ZIssue_SF and ZIssue_Case).
Execute the following APEX code via an anonymous block using developer console or workbench to remove existing Salesforce-Jira relationships.
delete[SELECT Id FROM zsfjira__ZIssue__c];The DML operation above may fail if there are too many (>10,000) records to be deleted. In such scenario, you can change the SOQL to append a “LIMIT” clause to it to reduce the number of records returned by the query and execute it multiple times.
If your Salesforce instance is connected to multiple Jira instances you will need to use the following Apex code instead to filter by Connection ID:
delete[SELECT Id FROM zsfjira__ZIssue__c WHERE zsfjira__ConnectionId__c = 'j00'];Replace 'j00' with the Connection Id that corresponds to the Jira being migrated to Jira Cloud.
Import the Case-Issue relationships from the CSV file
Before importing make sure any custom trigger, process or flow on ZIssue__c, ZIssue_SF__c and ZIssue_Case__c objects are disabled to avoid any unexpected error when importing the CSV.
Follow this guide to import the relationships CSV file Importing Existing Case-Issue Relationships into zAgileConnect
Please note that the example in the link above has only two columns but you will be importing the CSV file with 3 columns (CASENUMBER, ISSUEKEY, ISSUEWASCREATED).
** Please make sure to perform these steps in a test environment (Salesforce sandbox; preferably fullcopy and test Jira) prior to migrating the production data.
Rollback Options
To rollback to pre-migration Jira, please follow the steps below for each connection (when multiple Jira instances are configured):
- Establish connection with the pre-migration Jira instance
- Re-Save Salesforce package configuration steps 3, 4, 5 for that Jira connection
- Remove zAgileConnect objects data (code provided above) for a specific Jira connection
- Import Case-Issue relationship from that Jira
Migration Option 3
This process assumes that Jira Issues being referenced in Salesforce have been removed or migrated with different Issue IDs and Issue Keys during the JIRA migration from on-premise to Cloud.
Since Issue IDs will have changed in Jira during the migration from on-premise Jira to Jira Cloud, this step requires that a corresponding reference is available that matches the old Issue Key with the new Issue Key.
There are a number of ways to achieve this, including creating a custom field in on-premises Jira which carries the original Issue Key forward into Jira Cloud. This custom field retains the 'original' Issue Key value and it can be referenced in the context of the 'new' Issue Key value assigned by Jira.
Following the migration and prior to continuing with the following steps, please make sure to have exported a CSV with two columns that contain the 'original' and 'new' Issue Keys.
Migration of Salesforce-Jira links maintained by zAgileConnect to JIRA Cloud (from Jira Server or another Jira Cloud instance) involves the following steps:
Backup zAgileConnect objects representing Jira Issue and Issue-Case relationships
Create a CSV file with Case-Issue relationships
- Modify this CSV and replace the 'original' Issue Key with the 'new' Issue Key
Connect and configure the Salesforce org to the new Jira Cloud instance
Remove zAgileConnect junction objects data
Import the Case-Issue relationships from the CSV file
These steps are described below.
Backup zAgileConnect objects representing Jira Issue and Issue-Case relationships
In Salesforce setup go to Data Export and export the data for ZIssue__c, ZIssue_SF__c and ZIssue_Case__c
Create a CSV file with Case-Issue relationships
Generate a CSV file with only 3 column headers CASENUMBER, ISSUEKEY, ISSUEWASCREATED.
You can use the following SOQL query to retrieve the case-issue relationship data:
SELECT zsfjira__Case__r.CaseNumber, zsfjira__ZIssue__r.name, zsfjira__IssueCreated__c FROM zsfjira__ZIssue_SF__c WHERE zsfjira__Case__c != nullIf your Salesforce instance is connected to multiple Jira instances you will need to use the following SOQL query to filter the output by Jira Connection ID for each Jira instance being migrated:
SELECT zsfjira__Case__r.CaseNumber, zsfjira__ZIssue__r.name, zsfjira__IssueCreated__c FROM zsfjira__ZIssue_SF__c WHERE zsfjira__Case__c != null AND zsfjira__ZIssue__r.zsfjira__ConnectionId__c = 'j00'Replace 'j00' with the Connection Id that corresponds to the Jira being migrated to Jira Cloud.
Workbench can be used to export the data to CSV file via SOQL query.
Make sure to rename the CSV headers to CASENUMBER, ISSUEKEY, ISSUEWASCREATED.
Modify this CSV and replace the 'original' Issue Key with the 'new' Issue Key
Using the Issue Key export created at the beginning of the step, which provides the 'original' Issue Key value that corresponds to the 'new' Issue Key assigned in Jira Cloud, replace the Issue Key values in the CSV obtained in Salesforce with the corresponding 'new' values.
Connect and configure zAgileConnect with Jira Cloud
The same Salesforce instance that was previously connected to the original (source) Jira instance can be re-connected to new Jira Cloud (destination) following the Jira Cloud installation instructions zAgileConnect Installation & Configuration
Please note that after after authentication steps are completed, the remaining zAgileConnect package configuration (Steps 3 thru 6) that is inherited from original Jira should either be ‘Saved’ as-is or modified and Saved to allow these configurations to also be pushed to the new (destination) Jira Cloud instance.
Remove zAgileConnect objects data
Delete all the records for ZIssue__c Salesforce object. This delete will also delete in cascade the data for the junction objects (ZIssue_SF and ZIssue_Case).
Execute the following APEX code via an anonymous block using developer console or workbench to remove existing Salesforce-Jira relationships.
delete[SELECT Id FROM zsfjira__ZIssue__c];The DML operation above may fail if there are too many (>10,000) records to be deleted. In such scenario, you can change the SOQL to append a “LIMIT” clause to it to reduce the number of records returned by the query and execute it multiple times.
If your Salesforce instance is connected to multiple Jira instances you will need to use the following Apex code instead to filter by Connection ID:
delete[SELECT Id FROM zsfjira__ZIssue__c WHERE zsfjira__ConnectionId__c = 'j00'];Replace 'j00' with the Connection Id that corresponds to the Jira being migrated to Jira Cloud.
Import the Case-Issue relationships from the CSV file
Before importing make sure any custom trigger, process or flow on ZIssue__c, ZIssue_SF__c and ZIssue_Case__c objects are disabled to avoid any unexpected error when importing the CSV.
Follow this guide to import the relationships CSV file Importing Existing Case-Issue Relationships into zAgileConnect
Please note that the example in the link above has only two columns but you will be importing the CSV file with 3 columns (CASENUMBER, ISSUEKEY, ISSUEWASCREATED).
** Please make sure to perform these steps in a test environment (Salesforce sandbox; preferably fullcopy and test Jira) prior to migrating the production data.
Rollback Options
To rollback to pre-migration Jira, please follow the steps below for each connection (when multiple Jira instances are configured):
- Establish connection with the pre-migration Jira instance
- Re-Save Salesforce package configuration steps 3, 4, 5 for that Jira connection
- Remove zAgileConnect objects data (code provided above) for a specific Jira connection
- Import Case-Issue relationship from that Jira